articles
rescuing a photo: obstacles in the view field
In my first article about rescuing images that have suffered from bad lighting conditions — Rescuing a Photo: Lighting Problems — I have given the reasons for doing my best to save every single photo I took in the wild even if most people in other photography areas would consider it as completely unusable and not worth any further improvement efforts. That my argumentation is certainly valid now too — in this my discussion of dealing with another kind of spoilt shots.
You see below a photo of a rusty-nosed rat (Oenomys hypoxanthus) that I have taken in Uganda, near Bwindi Impenetrable Forest. It lived in bushes near the house where I was overnighting. Periodically it came out on a clear place but always escaped in the bushes as soon as it noticed me approaching with a camera in hand. Finally I had to photograph the animal when it was hiding among leaves and branches. I could see it well and was able to focus even at f/2.8 which allowed me to separate the animal in the picture from the surrounding objects. I got a pretty well composed image where the main subject — the rat — was pretty sharp, but, unfortunately, the branches and leaves in front of it were producing a brown colour haze. Even more problematic was the zones of low contrast and the colour cast were unevenly distributed over the subject. You can see in the original image presented here that, for instance, the cheek of the animal is free of haze and looks sharp while the area at the nose and the eye is extremely suffering of it.
Now put the cursor over the image to view the result of my efforts: The improvements are quite noticeable.
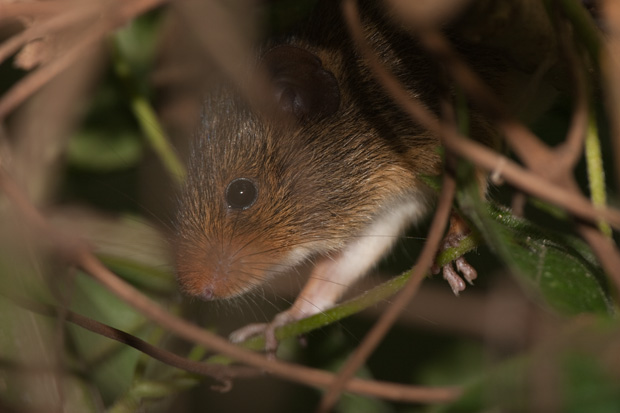
This rusty-nosed rat was hiding in a bush when I took this photo. The brownish colour haze all over the image is caused by branches and leaves in the foreground that were out of focus. If you put the mouse cursor over the image, you will see that a thorough postprocessing can do miracles even with an — as it appears, hopelessly damaged — image.
Obstacles in the view field are among the most usual causes of our failure to take a photo of an animal if we have found it among vegetation. If we would strictly follow the canons of wildlife photography that demand a crisp picture of an animal on a uniform background, we would have to reduce the scope of our subjects to a quite small number of species leaving in mountains, at sea shores, and open plains. Otherwise, with animal species that usually stay in dense grass or canopy, there is no alternative to photographing through grass or leaves. Then advanced postprocessing tricks like those that I am going to discuss below in this article may be the only way to a usable image.
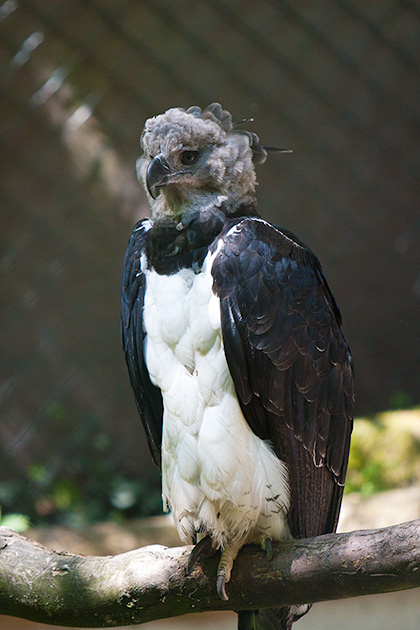
A Harpia photographed in a cage. Thanks to wide aperture the wire grid the camera was shooting through isn't visible.
Depending on the distance from the photographed object, the objects in front of it that are out of focus appear differently blurred. The blur increases with the distance. With certain aperture-focal length combinations, the frontmost objects may become virtually invisible in the picture when the distance to the focal plane (i.e. to the object in focus) is large while the depth of field achieved by the lens is shallow. Especially zoo photographers make use of this effect when shooting through grids and fences. The image below demonstrates this. I photographed this Harpia Eagle (Harpia harpyja) in Nürnberg zoo. The bird was inside a large cage so that the distance between me and the bird was at least 8 m. When I was taking this photo the lens of my camera was almost touching the wire grid of the cage. I was using a Canon EOS 30D with aperture set to f/2.8 and a EF 70-200 f/2.8 IS USM set to 200 mm. (What you see here is the entire, non-cropped frame after some saturation increase but no other postprocessing.) To a viewer who doesn't know how this image was made it may look as if I was inside the cage. However, someone who knows that there was a fence between me and the bird would — after some pixel peeping — probably notice the green colour cast on the bird; it comes from the green wire net the cage enclosure was made of. Such partial colour cast can be corrected in postprocessing as I am going to explain in the next section.
correcting colour haze
The following image demonstrates a case in my wildlife photography that is very similar to that of the harpia photo taken in a zoo. I took this photo of Greater Antillean Oriole in Cuba during my stay in Villa Maguana a small hotel at the Atlantic coast in the eastern part of the island. One evening I saw this bird in the bushes just behind the wire fence that was in a few meters from the house where I was staying. I had been already waiting for these birds and had my camera ready. However, the birds didn't come in front of the fence, and I had to photograph with the lens wide open through the wires. Other than in the Harpia photo, I had to keep a distance of several meters from the fence. However, the wire mesh was out of focus and sufficiently blurred for the bird to be completely visible in the photo. Unfortunately, a colour haze could not be entirely avoided, and you can notice it in the picture showed below as a bluish colour cast that is particularly visible on the black bird. This colour that is well recognizable even in this desaturated original becomes much more prominent when the saturation is increased.
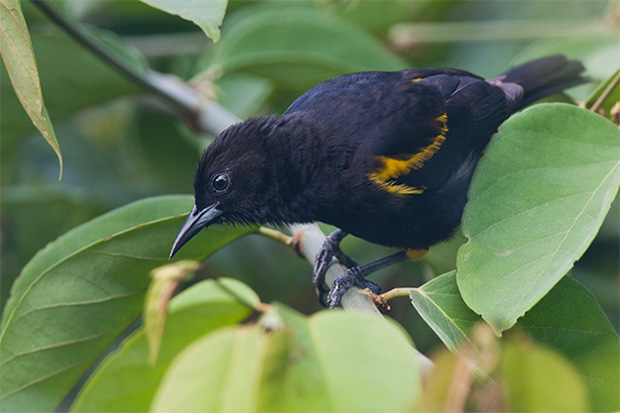
I photographed this Greater Antillean Oriole (Icterus dominicensis) near the house where I was staying at Playa Maguana in Cuba. Between me an the bird fence made of metal wire net that is causing a blueish haze in this image. This is the original image as I shot it through the fence at 600 mm and f/2.8.
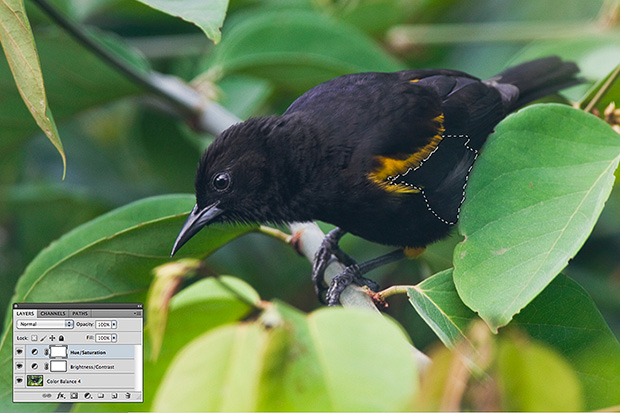
My procedure of removing the colour haze was the following. First, I used the Colour Selection tool to select the blueish area as showed in the next picture. Then I corrected the colour of the selected areas a little in a Colour Balance layer.
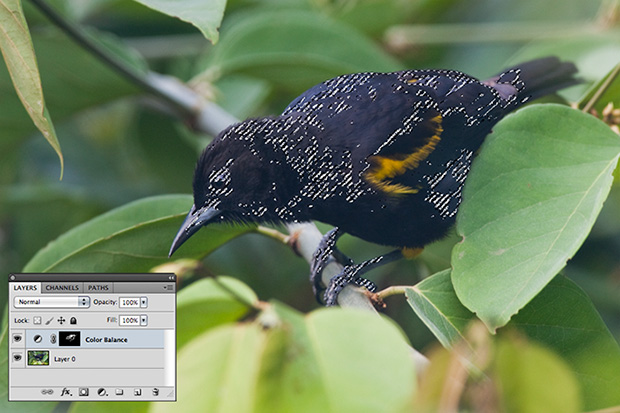
Step 1: Colour balance correction in a selection.
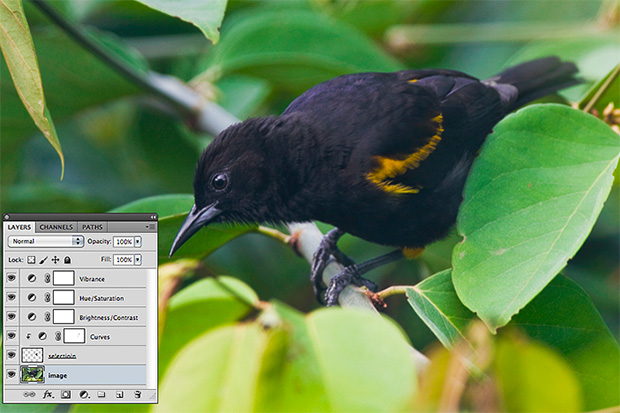
In the next step (see the image below), I applied some hue and saturation adjustments over the entire image. I also corrected contrast and brightness in a Brightness/Contrast layer. This didn't completely remove the blur caused by the out-of-focus objects. I selected one such area that I wished to get corrected with Lasso tool.
Step 2: Hue/Saturation and Brightness/Contrast adjustments of the whole image. Selection of a blurred area.
I copied the selected area in a separate layer and made some improvements of contrast in it using a Curves adjustment layer. My goal was to make the contrast similar to adjacent areas of bird's body.
Step 3: Curves adjustment on a selected area in a separate layer.
After I was satisfied with what I was seeing, I made final adjustments of colour in Hue/Saturation and Vibrance layers.
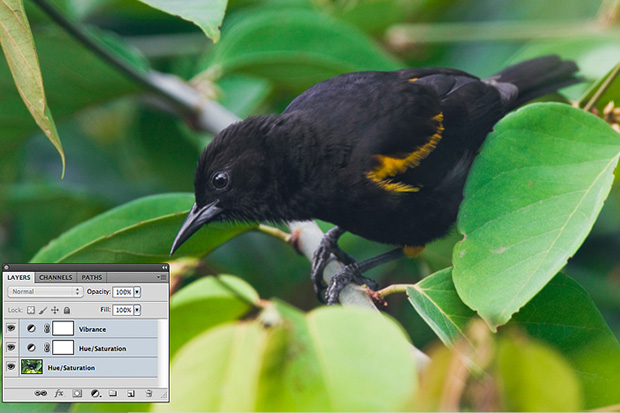
Step 4: Final Hue/Saturation and Vibrance adjustments.
You see the result of this process in the picture showed below. The image may not be absolutely perfect but it looks a lot better than the original. First of all, I could achieve my main goal: The black of the bird is black while the colours of the rest of the image are correct too.
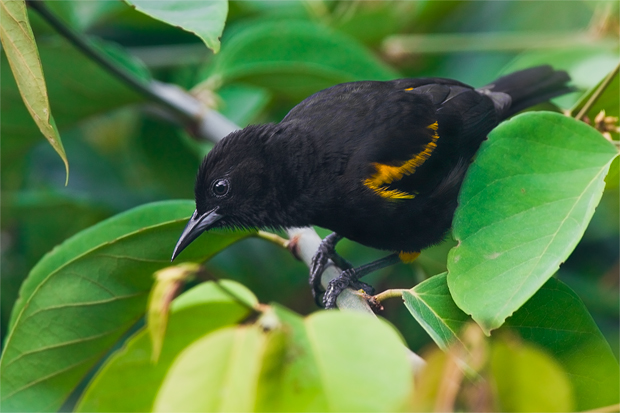
The result image that looks almost perfect — especially when compared with the original. (You can view the original if you place the mouse cursor over the image.)
Now, a purist may point at some blueish haze over green leaves. But since these areas are out of focus, I considered it as a not so huge problem that was demanding even more work. I don't think that many people would notice it if nobody tells what they have to look at.
In the correction process of the rusty-nosed rat photo presented at the beginning I used the same techniques but the whole work was much more complex.
getting rid of ghosts
I am not suggesting "ghost" as a term because a few other phenomena in photography are already being called so. I just needed a word to refer with it to the next kind of problem that I am going to discuss. So I would call here "ghosts" those clearly visible colour traces, or shadows, that not completely blurred objects leave on the photographed subject when they are in front of it. To cause this effect the object has to be farther from the camera than in the examples that we discussed in previous section — when it was very close and therefore appearing completely blurred.
| Here you see the final image, as it is presented among photos of korrigum in the online gallery on this site. (To view it, please click on the thumbnail.) |
I have seen many photos of forest animals when the photographer simply had kept those colour spots and lines running across the photographed subject. I do it quite often too — to have at least that little result and not to delete the whole bunch of my new images when I mean that they are a crap. Since it is almost never possible with a forest animal to catch the moment when the view at it is completely clear, I would expect that it is not only me who usually has only a few keepers after a day of shooting in a forest. Normally I delete such images where the ghosts are over critical areas, such as the head of the animal. If an image is otherwise good but a ghost is on animal's shoulder or other body part, I would keep it.
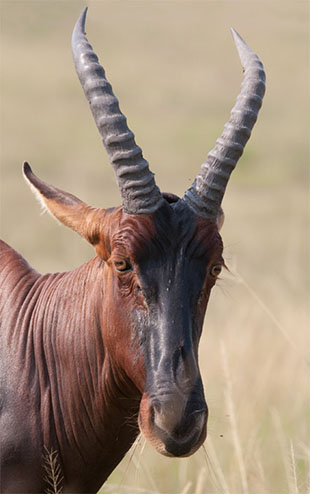
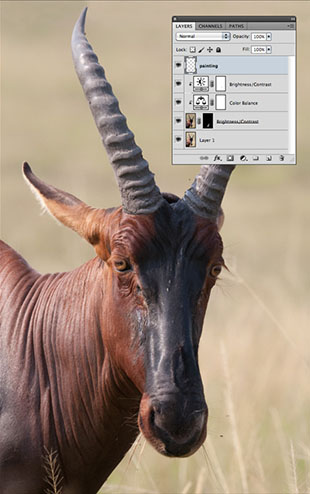
The unprocessed original of the image — with a yellowish semitransparent stripe crossing the nose of the antelope.
Sometimes, when the ghost is at a critical part of the subject in an overall good image, it is worth to try to remove it. Removing such artefacts isn't always possible and is never easy. To achieve a good result, you have to work very carefully and be patient. As with any advanced retouching process there is no standard procedure how you do it. Photoshop offers many alternatives, and you may decide according to the specific case and to your skills or preferences which one is appropriate. The retouching work that I am going to present here is only an example of a solution that worked for me in that one and in similar cases.
In the box above you see a portrait of a Korrigum, or Topi (Damaliscus korrigum jimela) that I have photographed in Uganda. Klick on the thumbnail to enlarge it. What you see, it the result of the postrocessing when I had to remove a ghost caused by a straw that happened to be in front of the animal. The picture on the right shows the original unprocessed image. You may notice a broad, yellow but transparent stripe going across animal's nose. The portrait was otherwise quite nice but this ghost stripe was ruining everything. Nevertheless, I decided to keep this photo and to try to eliminate the stripe trough retouching.
This is how I did it. Such ghost artefacts don't hide the image structure completely. You can see, for example, the structure of Topi's nose in this image despite the yellow stripe covering it. It just reduces the contrast in this area and adds a regional colour cast. So all that we have to do to solve the problem, is to restore the contrast and to correct the colour.
To work on this area, we need to separate it from the rest of the image. Sometimes one of many selection tools in Photoshop can be used just like in the case with the bird that I described in previous section. When the area is not large, like in this image, I preferred to process it in a layer mask.
First, I duplicated the image layer. On the copy layer, I increased contrast via Brightness/Contrast adjustment layer. Of course, this can be done in Brightness/Contrast adjustment dialog directly on the layer as well. I didn't know exactly how strong I have to increase the contrast. I just pushed the contrast slider as far as I felt would be right. After that I merged the adjustment layer to the copy layer of the image. The next picture on the right shows this step.
Then I created a hiding layer mask by choosing Layer Mask -> Hide All from the menu Layer. This had hidden the copy and revealed the original image from the lower layer. With white brush I painted the ghost area to make the one with increased contrast appear. See this step in the next picture on the right: If you put the mouse cursor on it, the painted area will be displayed.
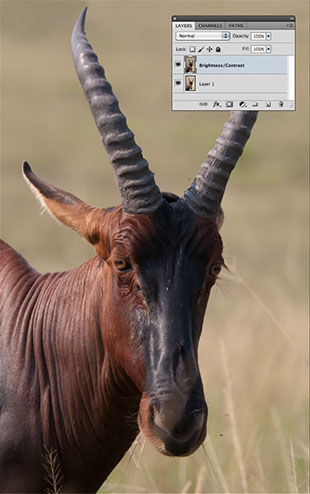
The image layer was duplicated and contrast was increased in the copy. The image here has a little more contrast than the original.
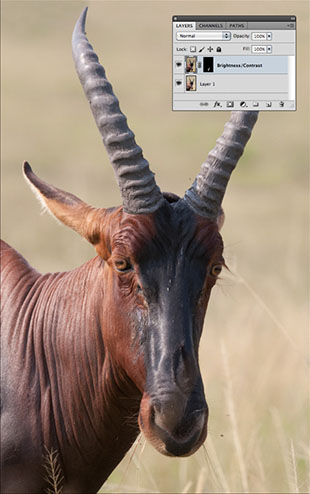
I created a layer mask from the second layer (the one with increased contrast). The layer was hidden by the original layer. Then I revealed a part of it in the ghost area painting it white. (Put the mouse cursor over the image to see it.)
Be careful while doing this and adjust the transparency of the brush now an then because there is no definite edge between the low contrast area and the surrounding normal contrast, i.e. you will need to create a gradual transition. Therefore some parts of the area that I painted were semitransparent. Of course, if you have overdone with revealing, you can correct it by painting with black. Your goal is to make the contrast in the ghost and in the surrounding area of the image look similar. This is achieved through careful trial and error work.
As you see in the right picture above, the yellow colour was still remaining after this step because I had worked only on contrast adjustment so far. Adjustment of colour was the next step yet to be done. I created a Color Balance adjustment layer that I applied only on the ghost area, i.e. on the mask layer. (See the left image below.)

The Color Balance layer is applied here only on the mask layer to change the colour only of the ghost.
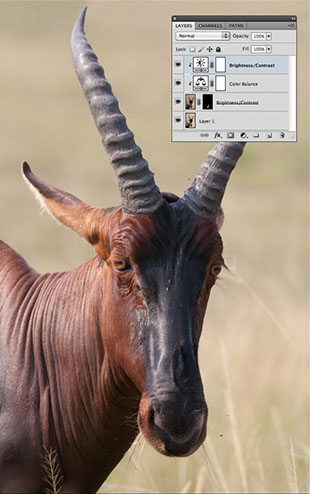
I applied additional contrast and brightness adjustments on the mask layer.
To smoothen the brightness and contrast transitions between former ghost area and the rest of the image even more, I painted with white and around 15% transparency in a separate top layer.
After that I did the last corrections of brightness and contrast. I started with a Brightness/Contrast adjustment layer. However, I finished up with painting some parts of the processed area with white brush set to approximately 15% transparency. Then I merged all layers in the image and did the usual adjustments of saturation, sharpening, etc. to achieve the desired look.
In this section I presented a quite simple case of retouching out-of-focus objects that are overlapping with the main subject. Theoretically this procedure can work in all, also in much more complicated, cases when multiple such shadows and semitransparent colour shapes appear on the subject due to vegetation. There is one prerequisite however: The structure behind the ghost has to be visible. If it isn't, i.e. the disturbing object appears in the image completely opaque, you can try the last method that I am presenting below.
removing obstacles
If the unwanted object is close to the focus plane, it will appear, though not sharp, but opaque and thus hide a part of the subject completely. If the object is large or covers an area of animal's body with a very specific structure — such as an eye or a year — you have very little chances to improve anything. Such a case is showed in the picture below. The photo of this chimpanzee male that I took in Kyambura Gorge in Uganda were quite good if not those two sticks at its face — one thick and one thin. I was waiting very long till the chimpanzee moves but it didn't. I couldn't change my position too because the ranger who came with me wasn't allowing it.
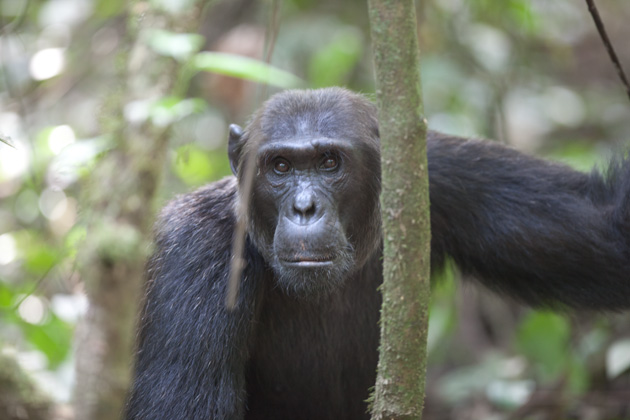
Two things are very disturbing in this image: that thick tree trunk in front of chimp's face and the thin branch hanging down at his face.
Certainly, I had wished that the trunk of a young tree were not there. But the chimpanzee was sitting at it all the time when I was shooting this series of images. Such large objects that hide a lot of details can't be removed in postprocessing. However, you can try out different retouching tools of Photoshop on a smaller object. As usually, all such means that provide a desired result are good.
On the next picture you see the result of my work which I find quite satisfying.
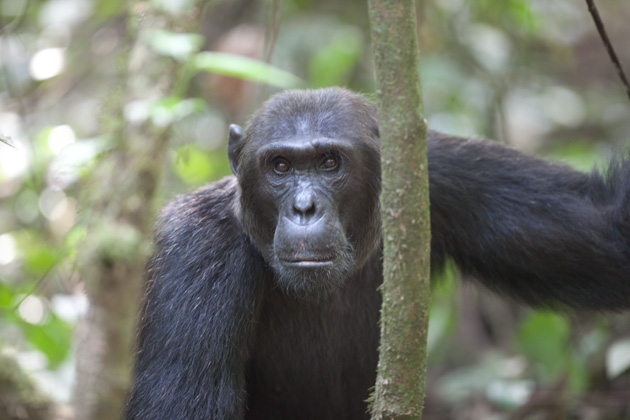
I used various tools available in Photoshop to remove the branch. As you can see now, it was quite successful.
I used all these tools: Clone Stamp ( ), Healing Brush (
 ), Spot Healing Brush (
 ), Patch (
 ). When applying these tools, the most difficult thing is — not to overdo. The processed area in the image should look as if it were originally there.
|
Here you see the final image, as it is presented among photos of common chimpanzee in the online gallery on this site. (To view it, please click on the thumbnail.)
|
However, even with these powerful retouching tools you can't always reconstruct the image structure. The line that the stick at the eye of the chimpanzee has left in the image was too opaque and the area that was free of it was too thin to provide enough pixels for cloning. Therefore I used some areas of the left cheek as source to reconstruct the pixel structure of the right cheek. Using the Lasso Tool I selected a small part of the left cheek and copied it to data buffer (per Ctrl + C, or Cmd + C — in Mac OS). Then I pasted it (per Ctrl + V, or Cmd + V — in Mac OS) and dragged with the mouse in place at the right cheek. The I flipped this piece of the image to mirror it — with the command Edit -> Transform -> Flip Horizontal. Doing so, I obtained mirror copies of the areas at the left cheek of the chimpanzee which I positioned at the right cheek in place of damaged pixels. I repeated this many times, till the whole area with damaged pattern was reconstructed. On the right, you see the result of this process — the image that is presented in chimpaznee gallery on this site. Click on the thumbnail to view it.