articles
rescuing a photo: lighting problems
In the age of film photography, there was a popular saying: "It is the photographer who makes the photo, not the camera." Though it was primarily supposed to sound consolatory for someone who could not afford a good camera, also photographers with professional cameras were aware of limitations of the existing technology and simply didn't expect too much from it. Thus, the saying had also another meaning: "A skillful photographer can make the best even with a crappy equipment." Modern technology has pushed many of the limits of film photography, so that digital cameras outperform any film cameras of the past in resolution, light sensitiveness, shutter speed, dynamic range, etc. This resulted in higher expectations of technical performance and, consequently, in higher demands for image quality in most genres of photography. Nowadays, in the age of digital photography, the cliché about "the photographer making the photo" has lost much of its sense because everyone knows that the capability of our electronic equipment is too often crucial for the success of our work. This is particularly true for wildlife photography. Too often not a single photo but the whole expedition will be threatened with failure due to inability of the equipment — particularly of the camera — to capture an image with adequate quality. The computer-aided postprocessing is often the last chance for us to save the hard work that we did in the field.
In digital imaging, postprocessing in a computer is equivalent to processing of a film that photographers were doing in a darkroom. Just like development of a film and making prints used to be integral parts of imaging process decades ago, postprocessing is such a part of digital imaging today and should be viewed as a step that normally comes after an image was shot with a camera. Like processing with chemicals was revealing the image captured on film, a RAW converter and an image editor today are doing the same with images captured to files. Like it was with film, processing of digital images can't do miracles. People with a background in film photography sometimes misunderstand the role of Adobe Photoshop and similar programmes thinking that so much control over image leads to careless shooting and that postprocessing skills are replacing the photographic. This isn't true. Indeed, image editing software is often being used by artists for other purposes than postprocessing of photographs. Also photographers use sometimes photographs as basis for artistic images that they create with Photoshop or similar programmes. But an image that wasn't created with photographic techniques can't be a photograph per se, and a photographic image that wasn't captured by the camera can't be created afterwards with any computer software. In modern photography a new cliché seems to have emerged: "It is the camera that makes the photo, not Photoshop." As long as we are processing a photograph in order to keep it and to make it usable as such, the use of Photoshop is a legitimate stage in photo imaging workflow. Otherwise such an image should be considered as a product of CGI (computer-generated imaging) or computer art: there is nothing bad in the way it was created — it simply would be a different genre, i.e. not photography.
Further in this article I am going to present an example of image editing process with Adobe Photoshop. It includes, in my opinion, completely acceptable steps for photography because the following prerequisites are fulfilled:
- The image being processed is a photograph.
- The content of the original image remained unchanged and can be clearly identified in the result.
- The result is a product of changes of the original image, i.e. contains no parts of other images nor other graphic content that can't be found in the original.
In nature photography the need for postprocessing and the degree to what it is done usually don't correspond to the photographic skills of the person who has taken the photo. As I explained above, the only way to create a photograph is to shoot it with a camera. Theoretically, any image can be improved in Photoshop to a certain extent, but you can't make a good image from a bad one. If the photograph is bad, you can improve it a little with postprocessing to make it usable. If it is generally good but has some faults that can be corrected in Photoshop, with careful work you can achieve very good to excellent results. With natural subjects, we almost never are able to control the light and the frame composition completely. In fact, cases when we can do it are very rare. Thus, in majority of images that we get a more or less extensive correction of problems caused by poor lighting, physical obstacles in front of subject, long distance to it, or technical issues, such as optical phenomena (diffraction, chromatic aberration, distortion, flare, etc.), sensor noise, etc. Some kind of retouching is usually necessary in at least 70% of images that I bring from a photo trip. Usually it is a minor correction: I remove dust spots from the sky, or a straw from the body of an animal, or lighten up shadows, or darken sunspots on leaves... Sometimes, however, it gets really complicated, and I can spend many hours working on a single image. Certainly, one can ask why not to keep only good images and only those with minor problems. It will be at least 50% which isn't bad even if it were a shooting in a studio. The problem is that in nature photography every single image is usually unique — at least in photographer's life. When I go to a remote place of the Earth to photograph animals or landscapes, often it is only one chance in my life, i.e. I wouldn't return to this place again. But even if I would, it is extremely unlikely that I would find the same animal or even the same landscape again. Thus, I always do my best to save every single image I captured even if it requires much work, and even if the result wouldn't win an award.
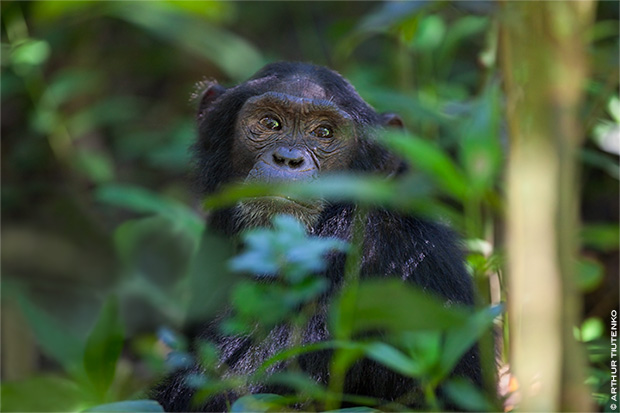
| Here is the final image, as it is presented among chimpanzee photos in my online gallery on this site. (To view it, please click on the thumbnail.) The following discussion in this article is based on this example. |
In June 2010, I was photographing chimpanzees in Kibale Forest and Kyambura Gorge in Uganda (see Field Notes from Uganda 2010). In a tropical forest and in forests, in general, the light is usually bad for photography: at some places it is just poor, i.e. it is too dark, while at some it is uneven, i.e. extremely light sunspots are mixed with very dark areas. Since I could with my 300 mm lens capture the images of chimps only when they were staying on the ground, the light in general was very dim, and I had to shoot with f/2.8 - f/5.6 and ISO 1600. Even then the shutter speed was very slow — maximum 1/50s. I didn't use a tripod because it could scare the animals and therefore it was prohibited. The chimps were always moving and I was moving with them, so even if a tripod were allowed, I would have had neither time nor enough space to set it up. Of course, I didn't use flash.
I got many blurred, or underexposed images, or such where faces of chimpanzees were hidden behind branches or leaves, or there were ugly bright sunspots on them. I had to sort out and erase more than a half of shots already at the location but even the best of keepers were requiring quite much correction work. For the following discussion, I have chosen one of such problematic images. To start, please, click on the thumbnail above and take a look at the result of the postprocessing that I am going to describe in the next sections of this article. If you haven't seen my explanation below, I bet you wouldn't be able to tell what was done with the image: It looks quite normal and even not bad at all — considering the circumstances in which it was taken.
the first look
Let us look at the original. The image that you see below was taken with EOS 5D Mark II and EF 300 mm F/2.8 IS L USM — with the following exposure settings: ISO 1600, f/2.8, 1/40 s. A you see, the shutter speed was very low despite high ISO and wide open aperture. The only option that I had, was to set an even higher light sensitivity but it would have caused even greater noise and destroyed the detail even more. I didn't do it hoping that I can manage to handhold the camera steady enough to minimize blur. Though my hands weren't shaking much, the image that I got was blurred quite significantly. In the minimized image showed here it is not as well recognizable but if put the mouse cursor over it, you will see at 100% crop of an area that the blur is obvious in the original size.
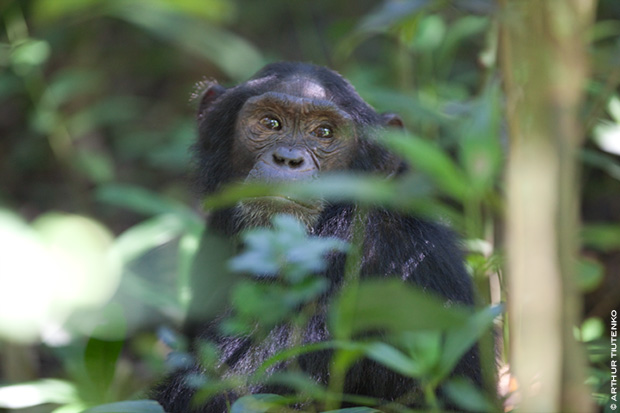
The eyes of this chimpanzee will always attract the first look of the viewer — and the first thing that the viewer will notice will be that they are blurred. (Place the mouse cursor over the image to see a 100% crop of an eye area.)
The eyes are the greatest problem here. The chimpanzee is looking, though not exactly at the viewer, but towards him. So the eyes are clearly attracting the look. They are the first thing that the viewer will notice in this image. Unfortunately the blur is visible on the eyes much better because the chimpanzee may have moved them a little when I released the shutter. Moreover, those eyes are shiny and are reflecting the light and the environment — the sky, trees, etc.
The next problem was caused by the quality of lighting: The image is quite well exposed but lacks contrast due to very low light. At the same time, the sun light that was falling on leaves resulted in some extremely light areas. These areas are are much lighter than the main subject and are detracting attention from it.
Since Photoshop is a more powerful image editing tool than the RAW converter, I decided to export the original to Photoshop without any changes. As editing format, I was using TIFF with 16 bit colour and ProPhoto RGB as working colour profile.
correcting the lighting
Blur and light spots are two separate problems whose solutions are technically different. Therefore I created two layers with copies of the image. I decided to work on light spots first. Since they are not on the main subject but around it, the retouching has to be done in the background, i.e. in the lower layer. To have access to the lower layer and to see what I am doing, I turned off the visibility of the second layer — as you see in the picture below.
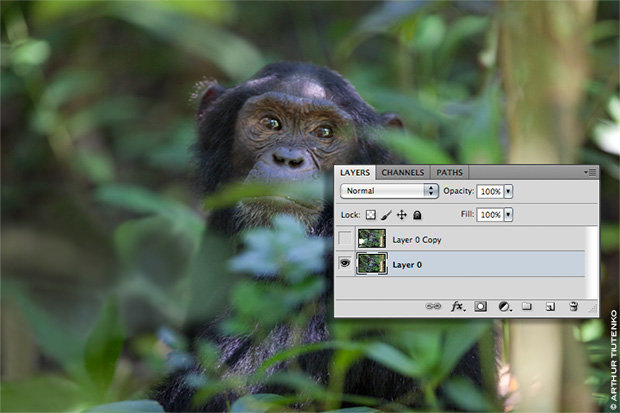
I created a layer via copy of the image and I removed in it the large bright spots that were caused by sun lit leaves.
After that, I removed the large bright spots in the left part of the image. All tools that help you achieve desired results are good. I was using mainly the Clone Stamp Tool ( ) and the Healing Brush Tool (
 ) followed by the Blur Tool (
 ). The goal was to provide a look of foliage out of focus in place of those burnt out spots.
removing noise
Since I was already retouching the out of focus areas of the image, I decided to reduce the colour noise as next. Though EOS 5D Mark II could deliver a good image quality at ISO 1600, the noise wasn't completely absent. It may become more evident after the image has been sharpened or vibrance has been increased. In the next picture you see a 100% crop of the background with quite noticeable colour noise.
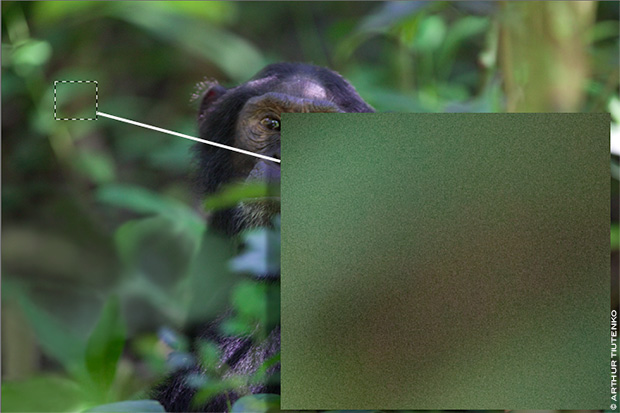
Since the image was shot with ISO 1600, one could recognize some colour noise at 100% image size. This noise may become more visible later — for instance, after final sharpening and saturation increasing. Therefore I removed it at this early stage of postprocessing.
I used Photoshop's Reduce Noise filter. Since this layer contains only parts of the image that should appear out of focus, it isn't necessary to preserve details and sharpness of them. Thus, I could apply the maximum of noise reduction.
extreme sharpening
For the next step, I had made the second layer visible again and was working on it. In this layer, I took some measures to increase the perceived sharpness. As we told at the beginning of this article, we can't create in Photoshop a photo that the camera hasn't captured. The "real" sharpness of an image comes from resolution which is the detail that the lens and the camera sensor could distinguish in the captured scenery and register. We can't re-create the detail that was missed by the camera in that case, but we can make the viewer believe that the detail is there and let our image appear sharper. With a blurred image like this one it is not an easy task, however.
If I were going to present this image only in a small size — like here — the Smart Sharpen filter in Photoshop would have been enough. Even the original picture in small size showed above looks well. But I was going to present it in large size or maybe even to print it. For such purposes, the image was way too soft.
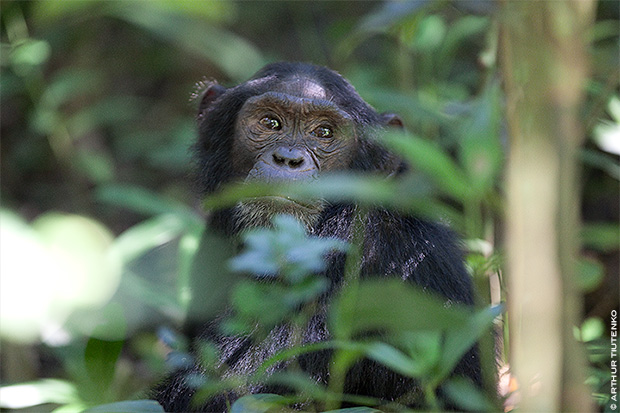
To make the eyes look sharper, I applied extreme sharpening to a copy of the image. (Place the mouse cursor over the image to see a 100% crop of an eye area.)
First I applied the Smart Sharpen filter with maximum settings and in Motion Blur modus. The whole image was looking extremely oversharpened after that (see the 100% crop in the picture above). My goal was, however, to make the face of the chimpanzee — particularly its eyes — look sharper, and it was achieved.
retouching
After such extreme sharpening, the image was looking in small size already nice — as you can see in the above picture. However, the eyes were still looking blurred. This was due to bright reflections in them whose edges were blurred. To make those areas look sharper, I had to do some manual retouching.
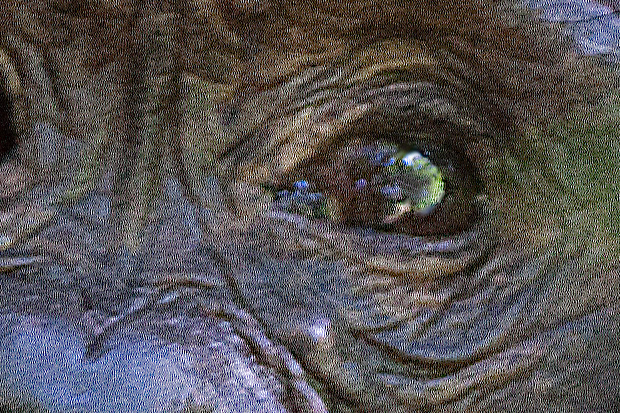
Here is one of the eyes after sharpening and retouching. With Clone Stamp Tool and Brush, I carefully corrected the look of the eyes — to remove the signs of motion blur. (Place the mouse cursor over the image to see a the original image of the eye area.)
Again, here are all means good. I used Clone Stamp Tool ( ), Smudge Tool (
 ), Healing Brush Tool (
 ), but you can try also other tools in Photoshop. It is important to work very careful because even very little mistakes can make the eyes appear odd. It is not necessary that your "painting" is precise, instead it should just correspond to the overall level of detail in the surrounding area of the image. It is not as easy as it sounds. While you are doing this work, you should frequently check the overall look of the image because it is very easy to overdo the retouching.
softening
To make everything look smoother after retouching, I applied some Gaussian blur to this layer. It softened the image just a little and removed some of the sharpening artifacts. To have more control over blur process and to be able to change the strength of blur afterwards, I converted the layer to smart object.
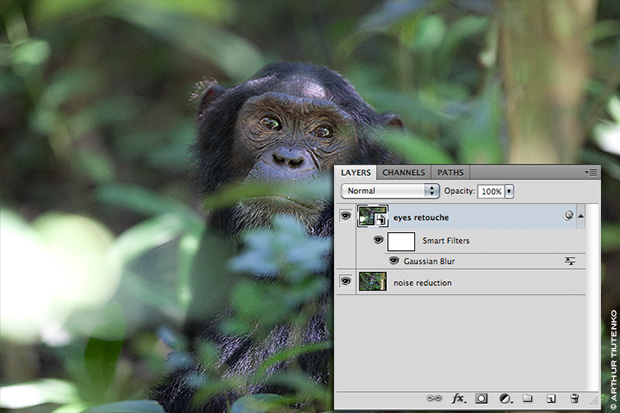
After sharpening and retouching, I applied a little Gaussian blur to smoothen the retouched parts of the image.
combining sharpening and blur
After I got satisfied with the results of Gaussian blur in the retouching layer, I rasterized the smart object. In the next step, I was going to combine two layers to one image. In that image only the face and some fur of the chimpanzee from the sharpened layer should appear. The rest should be from the blurred, i.e., the lower layer.
I created a layer mask (the Hide all variant of it) from the sharpened layer. Then I used a fully opaque Brush Tool ( ) and painted with white on the layer mask — as showed in the picture below. This revealed parts of the hidden layer that I wished to appear in the final image.
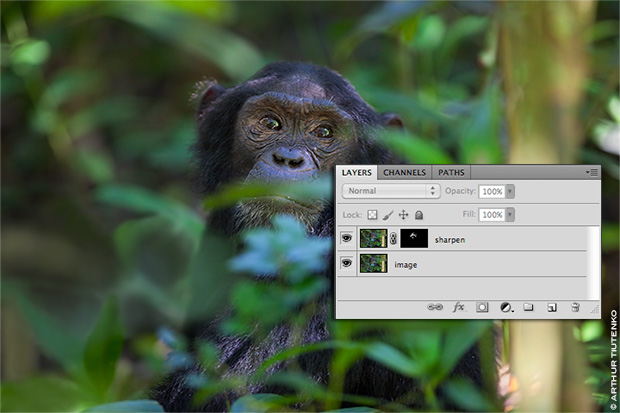
In the next step, I used a layer mask to combine the sharpened layer with the blurred one.
After that, I merged the layers to one.
image adjustments
At this stage, the image was ready for "usual" colour and exposure adjustments like those that I do with all other images. Since Photoshop CS, it can be done in separate "adjustment layers". This allows us to change the adjustments any time if necessary. The adjustment layers that I used for this image were Curves (to increase contrast), Vibrance (to push saturation and vibrance higher), Brightness/Contrast (to increase brightness).
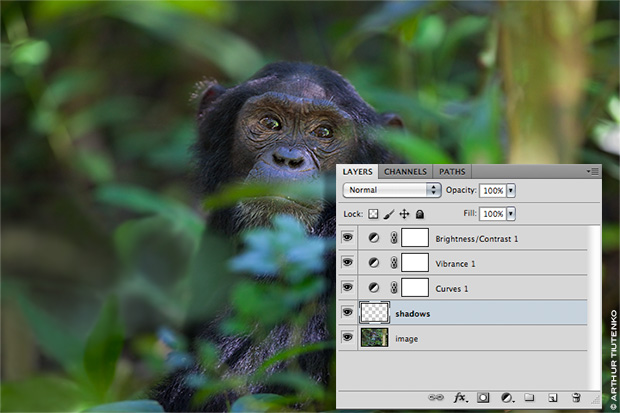
Colour and exposure adjustments.
In a separate layer, I darkened some light areas a bit. In the picture showed above, this layer appears as "shadows". I created just a normal painting layer and painted with black colour and about 20% opacity over the areas in the image that were too light. This made them look a bit darker and even revealed some detail that hadn't been visible before.
finalizing
For the last postprocessing stage, I merged all layers to a single one that I converted to smart object. On this layer, I applied several times the Smart Sharpen filter while I was resizing (scaling down) the image to the size I needed for publishing. Of course, I saved the resized copy to a different file and kept the full-size original.
Below you can compare the result of postprocessing with the original once again: If you put the mouse cursor over the image, the original image will appear.
In this small-size picture the image doesn't look as good as in larger size, however. Here it looks too sharp for my taste. You may get a better impression of the result of postrpocessing work described in this article, if you look again at the large-size image published in the gallery of chimpanzee photos that I was referring to at the beginning.
Well, the image that I got at the end is not perfect but quite good. The 21 Mp original may not be usable because the signs of postrpocessing are too well visible in it. But scaled down to about 50%, i.e. to 10 Mp, it will look good even when printed on paper.
